Item Manager Window
Purpose & Function

It is common for organizations to have numbers, codes or other identifiers associated with the printed materials they produce (e.g. "Form Numbers", "Publication Numbers", "SKUs", "ISBNs", "Cost Codes", etc.). The Item List Manager enables users to create and manage a customized set of identifiers that can be associated with printed materials managed in the P3 system. These identifiers can be set up in a hierarchy and reports can be created for groups of products.
The labeling of the Item List is very customizable. The "Items" can be called whatever the organization prefers to call them. We will refer to this part of the P3Source system as the Item List, but each P3Enterprise Group can change this to meet their organization's needs.
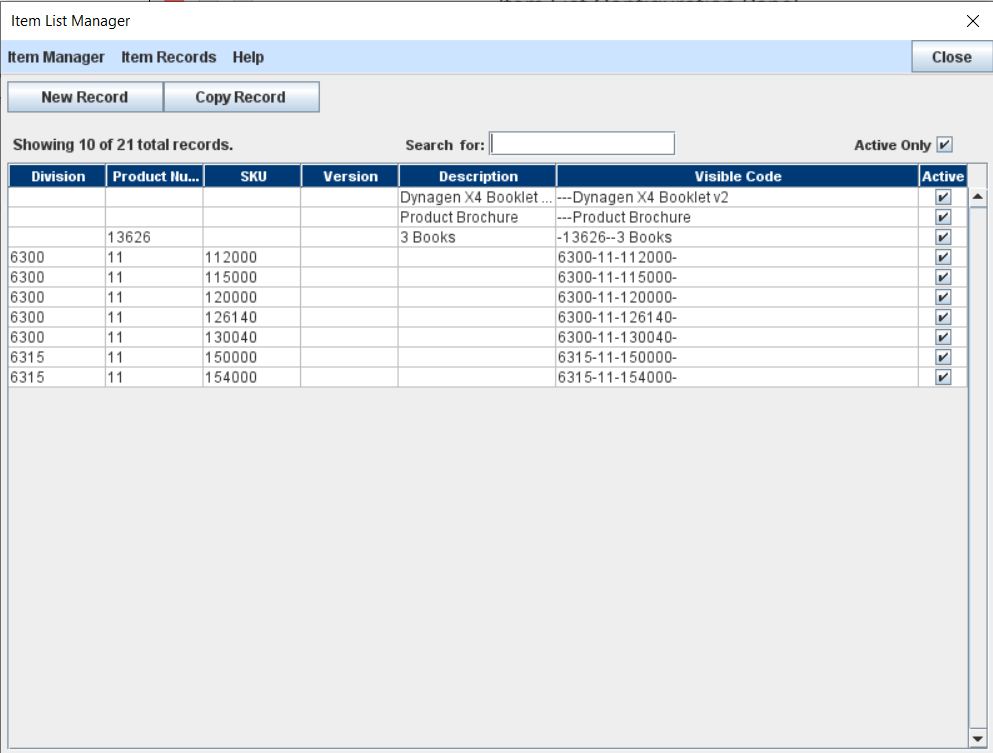
Item Records - Each Item on the Item List can have up to 4 separate parts in its code plus a description. Each part of the code has its own column on the Item List Table so we generically call them "Item Code Columns". The specific names of each column can be customized to meet the jargon and needs of the user's organization. The default names are Division, Cost Center, SKU and Version. These are examples of typical names used in many organizations.
Full Item Name - The "Full Name" of an Item is comprised of its 4 Item Code Columns and the Item's Description. In addition to this Full Name each Item has a "Visible Name". The Visible Name can be configured to show a subset of the Item Code Columns and Description. This can be helpful if parts of the Item information are not commonly used when referring to the item, but are useful in reporting.
Visible Name - Each item's Visible Name is a composite of the Item Code Columns and the Item Description. The Visible Name is what appears on the Job List and Item Selector on the Job Master window. The Visible Name can be configured to include any combination of the 4 Item Code Columns and the Description. If an Item Code Column is not part of the Visible Name, it can still hold data and may be used for reporting purposes.
Active/Inactive - Each Item Record also contains an "Active/Inactive" flag. This flag determines whether an Item will appear on the Item Selector list on the Job Master window.
The Item List Manager provides a full list of the items that have been created by users within a P3Enterprise Group. Individual items can be modified through the Item List Manager. The Item List Manager also has a selection mode, through which items can be selected for association with a job record. The Item List Configuration window is also accessed through the menus on the Item List Manager.
Adding and Editing Records
Item records may be edited directly in the Item List Table. Simply double click the record that you want to edit and type. This will open the Item Editor. While you are editing records no other users may edit the Items List or add new records to it. New records can easily be added using the New Record and Copy Record buttons on the Item List Manager.

New records can also be added from the Job Master window. If the user puts an item code in the item selector that is not on the list of items, the New Item Dialog will pop up to capture the details on the new item.
Selecting Items within the Job Master Window
When accessed from the Job Master window (click the Select Item button next to the Item field), the Item List Manager opens up in "Selection Mode". In this mode an extra column is added to the Item table. This column shows which Item is currently selected for the job that the Item List Manager was accessed from. The selection column shows a set of Select buttons. The button for the selected item shows in a bright green color, all the others are grey. Clicking the selector button on another item will immediately toggle it to being selected, and the button will turn green.
Accessing the Configuration Window

The configuration window for the Item List is conveniently accessed through the Item List Manager window. Click the Item Manager menu and then the "Configure List" menu item. That will launch the Item Configuration panel
NOTE: Only Enterprise Administrators may access and change the Item Configuration Panel.
Item List Configuration
Purpose & Function

The Item Configuration Panel can be used to customize the Item List section to meet the specific needs of each user organization. The Item List and configuration are both shared among all the users within a P3Enterprise Group. The Item data records and configuration data are stored in their own data file called "items.xml". This file is located in the Enterprise Data File Folder for the P3Enterprise User Group.
Customizing the Item List Label
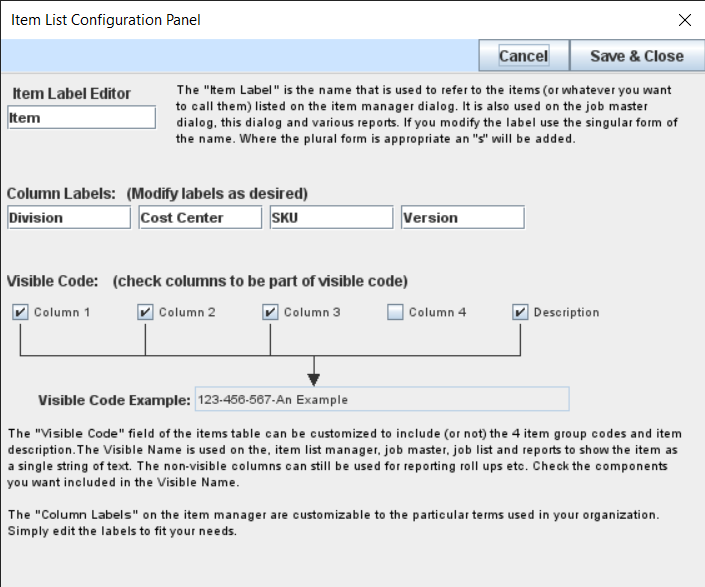
The overall name (or Item Label) for the Item List can be modified to suit the needs of each user organization. The Item Label appears in several places in the application:
- The menu on the main application window.
- At the top of the Item column on the Job List and Schedule List.
- Next to the Item selector on the Job Master window.
- All over The Item List Manager.
- On reports where labeling is needed to identify the Item data values.
The Item label is easily modified--just edit the text field on the Item Configuration Panel. Any changes will take affect when the Item Configuration Panel is closed.
Customizing the Item Code Column Names
Each Item on the Item list has four pieces of code data and a description. The four columns of grouping data can be renamed according to the needs of each organization's P3Enterprise Group. To customize the Item Group Column name, do the following:
- Select the current column on the list under the Column Name Manager title.
- The current name for the column will appear in the editing field.
- Edit the name to meet your needs.
That should change the Column Name. When you close the Item Configuration Panel, you should see the new name reflected in the column header.
Visibile Name
The Item Name that is visible on the Job List and the Job Master window can be configured to include some, none or all the Item Code Columns in the Item record. This means that items can have information associated with them that might not need to be visible all the time, but can be used for reporting purposes. For example, an enterprise might want the item's warehouse SKU number visible and also have a department cost code associated with their items.
To configure the Visible Name, simply check or uncheck the box for each column under Visible Name Configuration. The resulting visible name will appear in the Visible Name column of the Item List Table.
New Items

The New Item Dialog is launched when you click on the New Record button on the item List Manager window.
The New Item Dialog has input fields for the four Item Code Columns and Item Description. The Item Code Column fields are combobox controls that list all values that have been used on other items in that code column. This makes it handy to pick from a short list of frequently used codes.
When presented, the system attempts to put the values entered in the Item Selector into the group code selectors in the New Item Dialog. The code is broken into separate sections delimited by dashes "-". And placed in the code fields that are part of the Visible Name. If there are no dashes, then the entire code is placed in the first visible column code field. The Item description is populated with the job name, since very often the two values are similar.
Once the user completes adjustments to the Column Codes and Description, they can click the Create Record button to create the item record and save it.